Most people distinguish good photos from bad photos based on just a handful of factors: the focus, exposure, framing, and color balance. And while the first three are pretty obvious, color balance is the most mysterious. As a result, many snapshooters pay little or no attention to it, and that’s too bad—it’s easy to adjust, and can have an enormous effect on your photos.
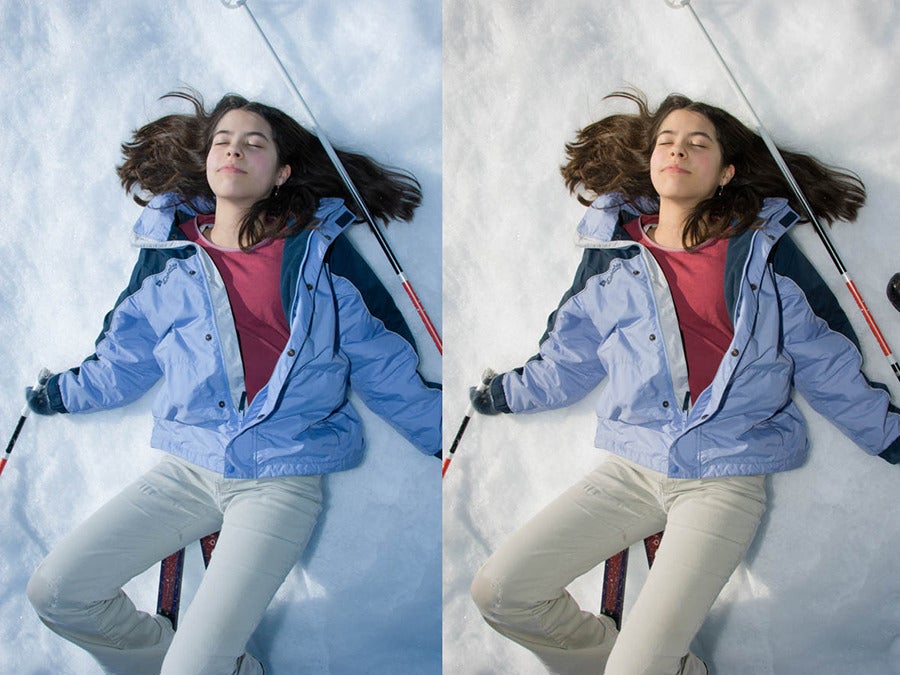
Consider these two photos, for example. One has a fairly pronounced blue cast—common in snow photography—while the other has been adjusted, and looks much better. But how does the color cast happen?
It all starts with the color of the light you’re shooting in. Every flavor of light—from midday sunlight to florescent lights to candlelight—has a specific color associated with it. You generally don’t notice it, because our human brains automatically color correct what we see. But even though we don’t usually notice it with our eyes, light really does have different color qualities. We call this “color temperature,” and it’s measured on the Kelvin scale. Light sources with low temperatures are called “warm,” and tend to have a reddish glow. Higher temperatures have a blue cast, and are considered cool. You’ve no doubt seen this many times. Candlelight, for example, which clocks in around 2000 degrees Kelvin, is quite warm and lends a red glow to photos. Here are some typical photographic situations and their approximate color temperatures:
- Daylight shade: 7500
- Overcast: 6500
- Late afternoon: 4300
- Sunrise and sunset: 3000
- Candlelight: 2000
That’s the science behind why color shifts happen in photos. But what can we do about it? Well, most cameras are equipped with white balance controls. White balance does what it sounds like: It makes sure that white surfaces in your photos look consistently white, no matter what color, or temperature, the ambient lighting actually is. And once your camera has corrected for white, all the other colors fall in line as well.
The white balance control on most cameras has three settings: Automatic, Presets, and Manual.
Your camera’s white balance is generally set to automatic. Indeed, you might not even have realized your camera had a white balance setting, because it’s designed to work automatically, and most of the time it does a reasonable job. Auto white balance works best in a range of typical daylight shooting conditions and when there is only a single light source. But if you’re shooting under a combination of florescent and incandescent lights, or tungsten lights and your camera flash, then auto white balance will goof. Snow and sand are also notorious for confusing auto white balance. Consider this photo, for example: The camera’s white balance is set for daylight, which makes the small, warm lights glow red.

When you’re shooting in tricky lighting situations, you might consider your camera’s white balance presets. Most cameras have at least a half-dozen options: daylight, sunset, candlelight, and so on. For better results than the auto mode, dial in a specific preset that matches your shooting conditions.
For the ultimate control, consider setting the white balance manually. In this mode, you work with your camera to set the correct white balance for your exact lighting conditions. To do that, you’ll want to bring a sheet of white paper or cardstock with you (I generally carry one in my camera bag). Have someone hold the sheet and focus the camera on it, so the sheet fills the entire frame. Follow the directions in your camera’s user guide to set the white balance based on the paper, and then take your photos as you ordinarily would. For the best color balance, set the white balance manually when you shoot at the beach or in the snow, or in a location with more than one kind of lighting, like a gymnasium.
Even some smartphones have white balance controls, though the ubiquitous iPhone does not. If you want to tweak the color balance of an iPhone photo, consider installing a more full-featured camera app, such as Top Camera or Camera+.
Whenever you take your camera off of auto white balance, remember to set it back to auto when you’re done shooting. If you leave your camera in a preset or manually set a custom white balance and then go shoot somewhere else, with very different lighting conditions, you can get some unexpected results.
And don’t forget that you can always color-correct your photos afterwards, on the computer, using your favorite photo editor. If you want to rely on post-production to fix photos, you will get the best results if you shoot in your camera’s Raw mode—JPEG images don’t tolerate having their colors tweaked nearly as well. No matter what you choose, though, remember that you can dramatically enhance your photos by paying attention to the colors and making sure that whites are really white—that’ll keep your blues blue and your reds red, as well.