
Channels DVR has grown from a limited over-the-air TV application to a powerful cord-cutting DVR with lots of advanced features.
With Channels, you can stream live and recorded TV from an antenna to your phone, computer, Fire TV, Apple TV, or Android TV device. It supports automatic commercial skipping, has all kinds of granular recording options, and allows for out-of-home streaming. If you subscribe to a pay TV service that supports TV Everywhere authentication (or know someone who does), you can record cable channels as well, and if you’re in a market served by Locast, you can record local channels with no antenna at all.
The problem with Channels has always been the hardware cost, as you’ve needed a desktop computer, NAS box, or Nvidia Shield TV to run the DVR server. But as the $35 Raspberry Pi micro-PC has become more powerful, you no longer need to spend upwards of $200 on server hardware.
Setting one up isn’t for the faint of heart though. To get Channels DVR running on a Raspberry Pi, you’ll need to be comfortable working with non-graphical command line interfaces and with poking around in your router’s settings. Most cord-cutters who want to record live channels should instead consider a simpler over-the-air DVR, such as as the Tablo Quad or a live TV streaming service that doesn’t require any in-home DVR hardware in the first place.
But if you want the feeling of liberation that comes from running your own DVR server, with all the fine-grained control that comes with it, read on for detailed instructions.

With the right hardware, Channels DVR can record local channels from an antenna and stream the video to all your devices.
Raspberry Pi DVR: What you need
To run the DVR server, you’ll need a Raspberry Pi micro-PC with as much processing power as you can get. The latest Raspberry Pi 4 with 2GB of RAM, which costs just $35, will do just fine. You’ll also need some other components to make everything work:
Over-the-air antenna: Any indoor or outdoor antenna should suffice, provided it gets good enough reception for local channels. The website antennaweb.org will help you determine how far away your local channels are and what kind of antenna you’ll need to receive them. Our guide to the best antennas will help you pick one.
HDHomeRun tuner: This allows Channels DVR to capture local channels from the antenna. The $99 HDHomeRun Connect Duo can play or record up to two channels at once, while the $150 Connect Quatro can tune to four over-the-air channels at once. This requires a wired connection to your router, so your antenna must be near your router unless you want to run coaxial cable through the house.
If your home Wi-Fi network can’t handle video streams of around 20Mbps, consider an HDHomeRun Extend tuner for $180, instead. It can transcode broadcasts before sending them to the Raspberry Pi, which isn’t quite powerful enough to transcode more than one stream at a time on its own.

An HDHomeRun tuner (like the $100 Connect pictured here) sends your antenna signal to other devices on your network.
Channels DVR subscription: This is required to use the Channels service, it costs $8 per month or $80 per year.
TV Everywhere authentication (optional): If you have a login for individual cable channel apps, such as ESPN or HGTV, Channels can capture those channels’ live streams. Most pay TV providers include these logins with their service. (If you’re using an antenna, non-sports channels from Philo make for an especially-powerful combo.)
MicroSD card: You’ll use this to install the Channels software on your Raspberry Pi. A 16GB card provides more than enough space and should cost less than $10.
External USB hard drive: The external hard drive is where you’ll store recordings. Expect to spend around $50 for a 1TB hard drive, or around $60 for a 2TB drive.
Raspberry Pi power supply: Unless you buy an all-in-one kit, your Raspberry Pi won’t include the requisite 15W power supply. If you don’t already have one, consider buying this kit, which also includes an acrylic case, heat sinks, and a Micro-HDMI cable.
SSH software on a separate computer: You’ll use this to configure Channels DVR. Linux and Mac have built-in terminal software, while Windows users can install Putty for free. You’ll also need a way to read your MicroSD card, so a USB card reader will be necessary if your computer lacks a MicroSD slot.
OS flashing software: You’ll use this to load a Linux-based operating system onto your Raspberry Pi. We’ll use BalenaEtcher for this guide, as it works well and is available on Windows, Mac, and Linux.
Streaming devices: Once you’ve set up the DVR, you can watch live or recorded TV through the Channels app on Amazon Fire TV devices, Android TV devices, Apple TV, iOS, Android, and the web. Amazon’s Fire TV Stick 4K is the most cost-effective option—I’d avoid the much slower non-4K model—and is frequently on sale for less than it’s $50 asking price.
Setting up the Raspberry Pi
We’re going to be doing a “headless” installation of Channels on the Raspberry Pi, meaning you won’t plug it into a TV or external monitor for setup. This does make installation a little trickier, but it spares you from needing a separate mouse, keyboard, and micro-HDMI cable, as you can do everything with your existing computer.
Start by downloading the Raspbian Buster Lite operating system from the official Raspberry Pi website. Be sure to select “Download ZIP” unless you have torrent software installed. Extract the zip file to gain access to the .IMG file inside.
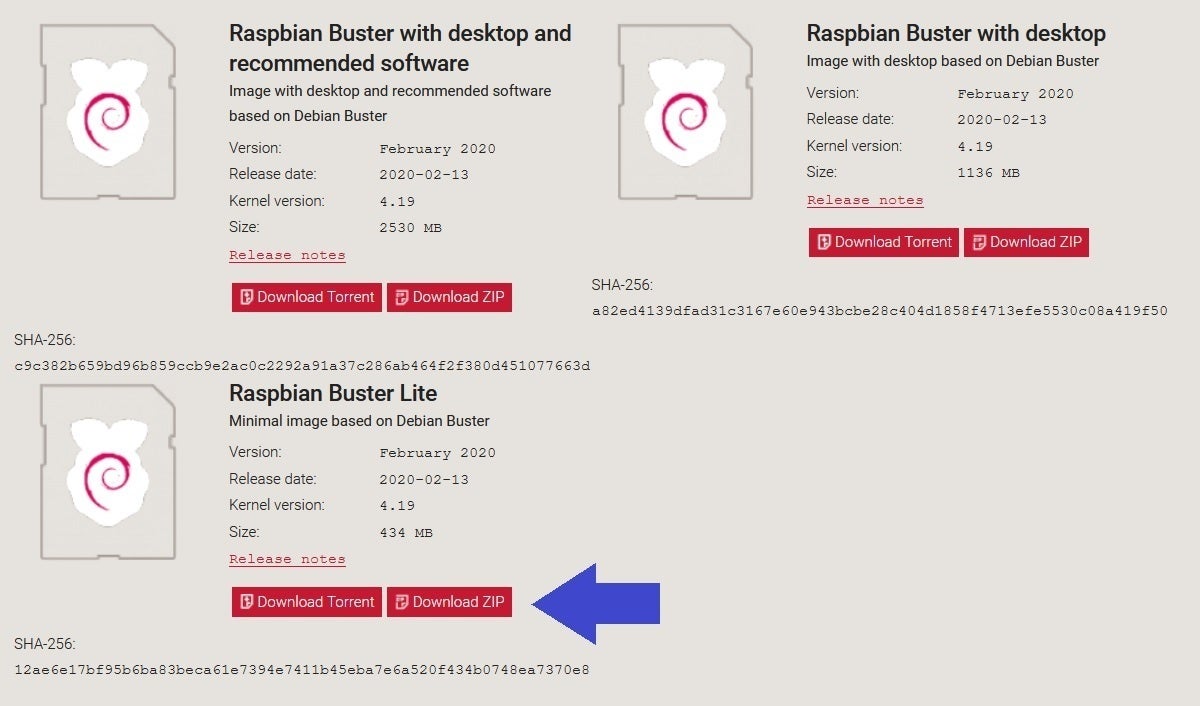
Installing Raspbian Lite allows you to run the Channels DVR software on a Raspberry Pi.
Insert your MicroSD card into your computer, then open up BalenaEtcher.
From File Explorer, drag and drop the unzipped .IMG file onto the “+” icon in the BalenaEtcher app. BalenaEtcher should detect your MicroSD card automatically; if it doesn’t, hit “Select Target” and choose it from the drive selection menu. Then, hit “Flash!” and wait for the operation to complete.

Drag your .ISO file into BalenaEtcher, select your MicroSD card, then flash the system image.
At the end, you should be able to open the SD card in File Explorer on Windows or Finder on the Mac. (If not, try removing and inserting the SD card again.) You might also see a message in Windows saying that you must format the drive to use it. Dismiss this message and find the root level of your SD card, which should be called “boot.”
Now, you’ll need to make sure the Raspberry Pi can connect to your Wi-Fi network (if you’re not hooking it up with an ethernet cable, that is) and allow your computer to control it through secure shell.
Start by creating a text file in your MicroSD card’s root directory and adding the following text:
country=US
ctrl_interface=DIR=/var/run/wpa_supplicant GROUP=netdev
update_config=1
network={
ssid=”YourWiFiNetworkName”
psk=”YourWiFiPassword”
key_mgmt=WPA-PSK
}

Your wpa_supplicant.conf file should look like this, but with your actual Wi-Fi credentials filled in.
Be sure to replace YourWiFiNetworkName and YourWiFiPassword with your actual Wi-Fi login details in the file above. Save and close the file, then rename it to wpa_supplicant.conf. In Windows, you should see a warning that you’re about to change the file type, which is fine.
Next, create another text file in your MicroSD card’s root directory and rename it to “ssh” with no file extension at the end and no text inside.

Your MicroSD card, labelled “boot” in File Explorer, should have both the wpa_supplicant.conf file and blank ssh file in the root directory, as seen in the bottom of this image.
Again, be sure both of these files—wpa_supplicant.conf and ssh—are in your MicroSD card’s root directory. Then, remove the card from your computer, insert it into the Raspberry Pi, and power it on.
On your computer, you’ll need to find the IP address that your Raspberry Pi is using. The easiest way to do this is to open a settings page for your router and locate “raspberrypi” under the list of clients on your network. (If you’re unsure how to reach your router settings page, see instructions for Netgear, Asus, Linksys, TP-Link, or Belkin, as appropriate.)

Your router’s settings menu (such as the Asus router menu pictured here) should include a list of all connected devices, including one labeled “raspberrypi.” Write down the IP address associated with it.
Once you’ve found the IP address for your Raspberry Pi, write it down. If you don’t see “raspberrypi” in your device list, something went wrong and you’ll need to retrace the above steps.
Installing Channels DVR
At this point, we’ve installed an operating system on the Raspberry Pi and connected it to Wi-Fi. Now it’s time to install Channels DVR.
On a Mac, you can open up the built-in Terminal under Applications/Utilities. In the Terminal, type the following:
ssh pi@YOUR.IP.ADDRESS.HERE
Of course, instead of “YOUR.IP.ADDRESS.HERE,” you’ll enter the IP address you wrote down in the last section.
If you’re using Putty in Windows, you can enter “pi@YOUR.IP.ADDRESS.HERE” under “Host Name,” again using your actual IP address instead of those capital letters. Select SSH under “Connection Type,” then hit “Open.”

With Putty, enter “pi@” followed by the IP address you wrote down in the “Host Name” box, then hit “Open.”
The Terminal will now ask you for a password, which by default is “raspberry” (without quotes). Once you’ve logged in, I strongly suggest setting a new password by typing “passwd” into the terminal and following the on-screen prompts.

Changing your Raspberry Pi’s default password is highly recommended.
The next thing we’ll do is make sure the Raspberry Pi can read your external USB drive when it boots. Plug it into the Raspberry Pi, and in the same Terminal window you’ve been using, type the following:
sudo mount /dev/sda1 /mnt
sudo chmod 775 /mnt
sudo nano /etc/fstab

Use these terminal commands to mount your external hard drive at boot-up, hitting enter after each one.
After entering the last line, you’ll enter a separate menu. Under the last line that reads “PARTUUID=” create a new line and enter the following:
/dev/sda1 /mnt ntfs defaults 0 0

Don’t be afraid of this menu. Enter the additional line highlighted in red just as you see it here.
Hit Ctrl-X to exit, then hit Y, and then hit Enter to leave this menu.
Next, we’ll install Chromium, which will allow Channels DVR to stream cable channels if you have a pay TV login. Back in the Terminal, enter the following:
sudo apt-get install chromium
Hit Y once the installation is complete.

Install Chromium if you have a pay TV login and want to record cable channels.
Finally, install Channels DVR by entering the following in the Terminal:
curl -f -s https://getchannels.com/dvr/setup.sh | sh

The last Terminal step is to install Channels itself.
Wait for the installation to finish, then exit the Terminal. With any luck, you’ll never need to visit it again.
Configuring the DVR
After all that, configuring Channels DVR is relatively easy.
First, make sure your HDHomeRun tuner has an antenna hooked up to it, is connected to outlet power, and is connected to an open ethernet port on your wireless router.
Then, in any web browser, head to http://dvr-raspberrypi.local:8089/. You’ll be prompted to log into your Channels DVR account, which means you’ll need to sign up if you haven’t already.
After signing in, you’ll need to pick a directory for DVR storage. Choose the directory called “mnt” as this points to your external USB hard drive. Choosing any other directory will consume the limited space on your MicroSD card.

Be sure to choose “mnt” as your storage location. (You won’t see the “existing DVR” mesesage above unless you’ve used Channels with your hard drive before.)
On the next page, Channels should automatically detect your HDHomeRun. Enter your zip code, hit “Search,” then choose “Local Over the Air Broadcast.” Channels will then scan for broadcasts and pull in local TV guide data.

Add your TV sources and include your zip code for local guide data, and you’re ready to go.
If you want to add Locast or a TV Everywhere source, select “Add Source” at the right-hand side of the screen. This will bring up a menu where you can log into your account.
Finally, be sure to select “On” under the Remote DVR menu if you want to access recordings while you’re away from home.

Compared to the setup process, using Channels DVR’s apps is a breeze. Pictured here is a Series Pass recording menu.
You can now begin using Channels DVR. Download the free apps for iOS, Apple TV, Android, or Fire TV to start watching or recording live TV. You can also access the service through the web and change settings at http://dvr-raspberrypi.local:8089/.

And here’s a shot of the grid guide for good measure.
If you have any questions, you can reach me by email or on Twitter. And for more cord-cutting advice, check out my weekly newsletter.
(Thanks to Dani Dudas and The Pi Hut, whose own Raspberry Pi setup guides were invaluable in creating this one.)