

So you’ve just brought your brand-new TV home, unboxed it, and turned it on. The picture looks great, but you’re not 100 percent pleased with some of the minor digital artifacts you see. The color could use some tweaking, too. And just maybe if you…
Don’t reconsider the salesperson’s pitch to send a technician to your home. That’ll cost you at least a couple hundred bucks. We’ll show you how to calibrate your TV in a fashion that will iron out some of the most common image issues and achieve best picture your new set is capable of. And most of our recommendations won’t cost anything more than your time.
To tweak or not to tweak
Before we get to the nitty-gritty, the vast majority of TVs exit the factory adjusted pretty darn well. This wasn’t always so, but odds are anything modern you buy is 98 percent of the way there. Choose the “home” option at first setup and if you’re like most viewers, you’ll be perfectly happy with the image quality. If that’s the case, spend your time watching a great movie instead of fiddling with the TV’s advanced picture settings.
 Michael Brown/IDG
The first step in your calibration process is to make sure your TV is set for in-home use and not store demonstration mode.
Sanity check aside, if you’d like to milk those last couple percent of image quality from your TV, we’ll guide you through the process. Just don’t expect your $300 TV to all of a sudden look like it has quantum dots or OLEDs onboard. The technology you bought is the technology you bought, and no amount of twiddling will change that.
The HDR factor
High dynamic range (HDR) is the latest hot feature with TVs, and we’re discussing it up front because it can effect the adjustment process. An HDR TV will generate far more brightness than a standard dynamic range TV. Note that “HDR compatible” doesn’t count. It simply means that the TV understands the info, but it can’t really do anything with it.
HDR standards such as HDR10, HDR10+ and Dolby Vision are basically adjustment information embedded in video that tell your TV how to render the material. In our experience, HDR works best with TVs that have at least 700 nits of peak brightness. You’ll get some of the HDR effect (vivid laser shots, more detail in dark areas) with TVs generating less than that, but the overall palette can be quite dark, especially with the older HDR10.
 Dolby
Dolby
Dolby Vision HDR versus standard dynamic range
HDR10 adjusts the TV only once, at the beginning, and must consider the entirety of the movie when doing so. We have on occasion brightened an HDR10 title, though this is not possible on all TVs. Some will even lock you out of basic brightness and color adjustments while HDR is in play.
HDR10+ and Dolby Vision send adjustment info continually throughout the material, so anything you adjust according to one scene might mess with the next one or simply be thrown away. But if you feel the need, by all means give it a go. Here are the first steps.
Basic Adjustments
You could also call this step rudimentary calibration, and it shouldn’t take more than 10 minutes. All you need are a few test images and your eyes. You can also use a light meter, but that’s for later. So grab your remote, head to the picture settings and read on about the various things you might need to adjust. We’ll get to the finer points and true calibration in a bit.
Brightness: This is actually nothing like what you do with a common household dimmer switch—it’s a black level control; i.e., it adjusts the level of brightness (or lack thereof) that’s considered absolute black. You’ll increase the value to raise it, and decrease the value to lower it. Visually, it seems to have much the same effect as a dimmer, but there’s a subtle difference as you’ll see when we discuss contrast.
Before adjusting brightness, you might want to turn off adaptive brightness, which changes the strength of the backlight according to the amount of ambient light the TV senses. If left on, you won’t be able to see the actual results of your tweaks.
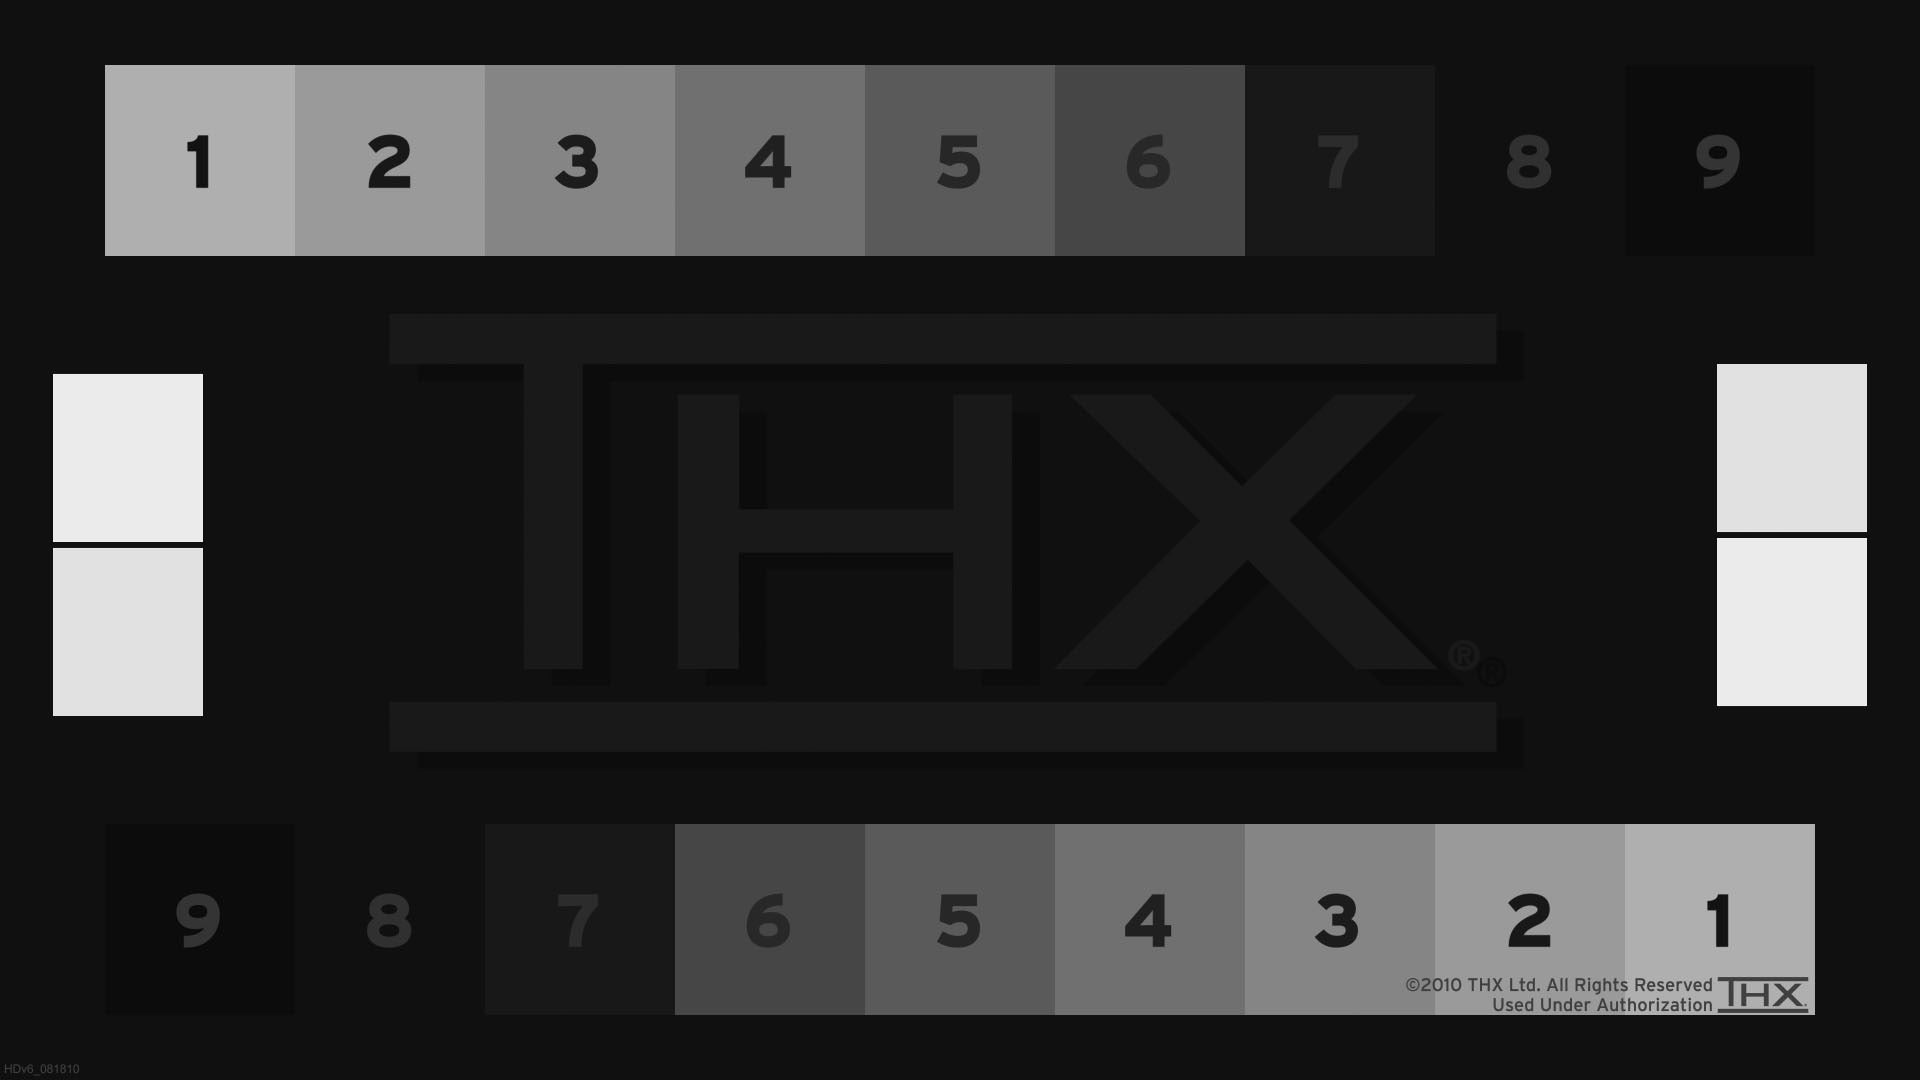 THX
THX
With this image on the screen, adjust your TV’s brightness control until the large THX logo’s shadow in the center is just barely visible. To get this image on your TV, click to maximize it and then right-click to save it to a flash drive you can plug into your TV.
Backlight: Now this is a brightness control, but it only applies to LCD TVs or other types that use a separate source for luminance. OLEDs don’t have this because the light source is the diode itself—not a light shining through it. Increasing the strength or luminance of a backlight will result in a brighter picture, but it will also increase bleed around the edges of a TV as well as from the LCDs themselves (which are not perfect shutters) and the area surrounding them.
On some TVs, you can wash out color almost entirely by increasing the intensity of the backlight. Don’t do that. Generally speaking, leave the backlight as low as possible for the ambient light conditions while still maintaining suitable bright highlights bright. Opposite to color adjustment, you can lose edges and detail if you turn the backlight down too low, though some TVs won’t let you go that low.
Contrast: Again, this doesn’t really adjust contrast—i.e., the difference between adjoining light and dark areas—it changes the white level, or what hue is considered absolute white. So, brightness equals black level, and contrast equals white level. The difference between the two is your actual contrast level. That’s why it’s a good idea to revisit brightness after you adjust contrast, and vice versa.
Lowering the contrast, along with the brightness can help mask processing issues such as shimmer and moiré, and raising it can help bring out detail in darker areas. How much it will help will depend on your TV. THX
Color: This TV term actually sits closer to its mundane meaning, but refers to the intensity of color, or in industry-speak—saturation. It’s not the hue or RGB balance—those are in the fine settings we’ll cover later. Turn this setting up too high, and the colors overwhelm the details. Set it too low, and voila! You have a black-and-white TV, and a great way to to de-colorize old movies that have been “modernized.”
Saturation settings are easily done by eyeball. When you notice detail declining, you have just more than enough color. We recommend using an episode of The Simpsons for testing. In practical terms, when Bart Simpson’s skin color starts obscuring his outline, you’ve gone too far. Practically speaking, your adjustments should be very minute.
 IDG
IDG
These are readings from our UPRTek MK350N color meter showing skew in a white LED backlit TV.
You will also find color space settings, which can generally be left on automatic. But if you do have them and want to manually set your color depth, you’re fine with Rec.709 for most material; but with 4K HDR, you’ll want Rec.2020 if it’s available.
Tint: On some older sets, this might be called Hue. Originally designed to correct phase errors in communications between TV tuners and broadcasts, it modifies the proportion of red or green in each non-black color. The odds of your having to adjust this these days are negligible, but if your favorite star’s face is looking a little green around the gills, use the tint setting as the quick stomach remedy. If it doesn’t deliver a satisfactory result, you might need to check the advanced RGB balance settings—or buy a new TV.
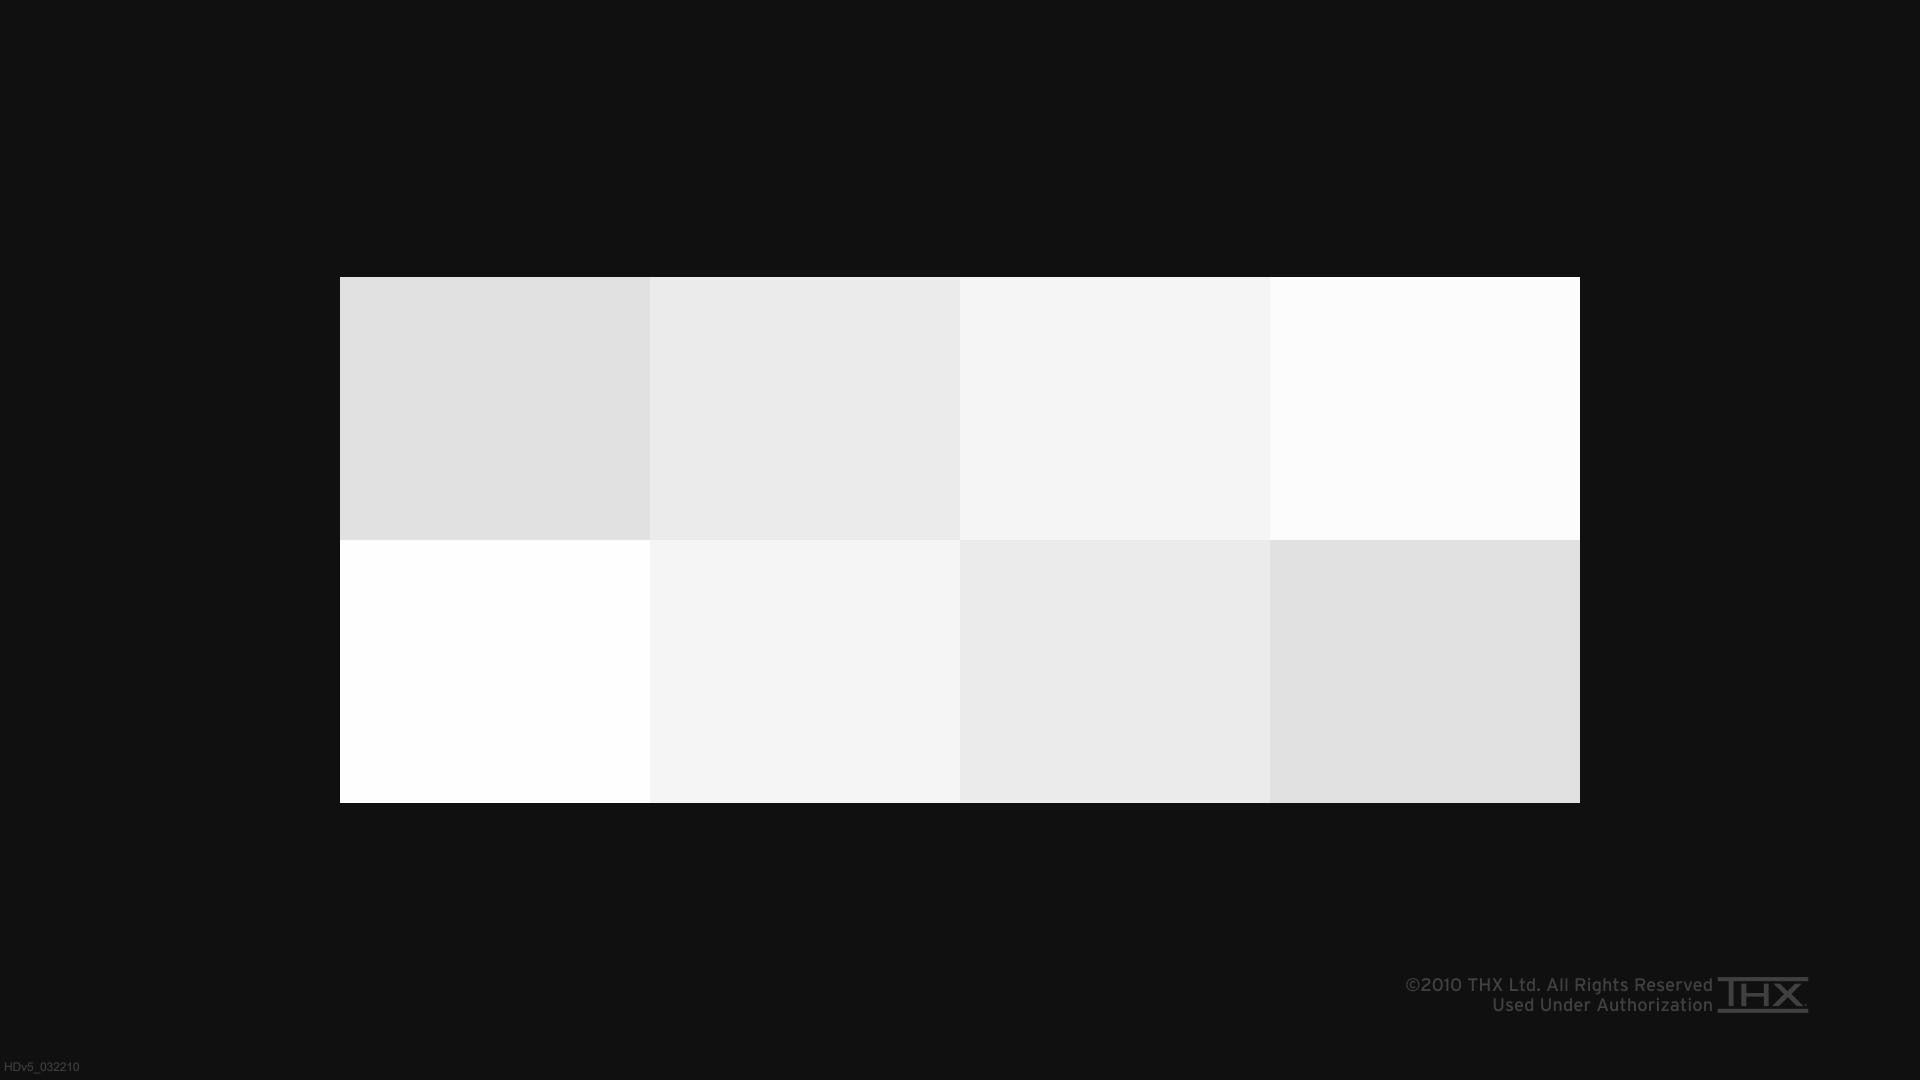
 IDG
IDG
You can use this image featuring pure RGB black, white, red, green, and blue to gauge the accuracy of your TV’s color. If you don’t have a meter, look for green that looks lime and red that looks orange. If you can dial these out, fine. But with some TVs, it isn’t possible due to the backlighting being used.
Sharpness: This is the level of perceived detail and delineation of edges that you’ll see in an image. These days it basically adjusts the anti-aliasing algorithm used by the TV’s image processor. Too much and you’ll see jagged, aliased edges; too little and detail gets muddy. This is all according to taste, but TVs generally ship adjusted to “mild cheddar;” that is, a level that most everyone will find acceptable.
Some TVs also reduce sharpness to mask issues such as moire, shimmer, flicker, etc. that become more and more difficult to avoid as technologies that demand greater brightness such as HDR come into play. Handling those extra bright highlights perfectly when in motion is the video processing equivalent of cold fusion—it ain’t been done yet.
Motion: This is an adjustment that, as with sharpness, involves a trade-off. In this case, however, it’s between reducing artifacts such as judder (sudden jumps) and stutter in action sequences and pans, and retaining detail. If you want to see how much detail you’re losing, pause in the middle of a fast action sequence and study the edges of objects.
The difference from this setting can be dramatic—if your TV has the chops. Most TVs with a 60Hz hardware refresh rate suffer at least some occasional judder (jumpiness) or jerkiness, while 120Hz models rarely do. The extra cycles enable the frame-rate conversion porocess (59.97fps to 60fps and son) to insert black frames to be inserted, as well as other tricks to smooth the action.
TVs with higher hardware refresh rates also tend to employ better CPUs. You can ignore the rest of the phrases and numbers vendors throw at you—it’s just their way of saying they employ tricks such as flickering the backlight to ameliorate motion issues. Adjust to taste.
We like smooth except where it produces a “shot to video” effect, which can happen on cheaper TVs. Hollywood feels differently and you may find a “film mode” on newer models, which is supposed to come closer to the original “vision” of those who produced the material.
Image size: Also known as Aspect Ratio. Most modern content features a 16:9 aspect ratio. Nearly all TVs in the flat-panel era have the same 16:9 ratio and the two marry perfectly. A lot of older movies and some TV broadcasts, on the other hand, use narrower aspect ratios and should be displayed pillar-boxed; i.e, with vertical black bars on the left and right. True 4K or 4096 x 2160 (17.1:9) would be slightly letter-boxed, or with small black borders at the top and bottom of the display—just like high-resolution content displayed on a display with a 4:3 aspect ratio.
If everyone looks unnaturally thin or thick, or images appear truncated, you have the wrong setting. The settings you want are called 16:9 or Wide for HD (720p), FHD (1080p), or UHD (2160p) content, and 4:3/Standard for broadcast or older movies. A modern TV should correctly sense the signal and automatically adjust the way it’s displayed, unless you override it. That said, we’ve seen sensing inaccuracies with material streamed via DLNA or other sources on occasion.
Fine adjustment
Now let’s get down to the nitty-gritty, or what videophiles consider calibration. If you look around in your TV’s advanced settings, you’ll probably run across some complicated-looking stuff: color temperature, gain, and offset for red, green, and blue; white balance; and gamma. You can try to eyeball these settings, but as the differences can be so fine, you’d probably be better off with a hardware assist, which we’ll discuss next.
You can mess your picture up in a hurry with these fine settings, but they’re also the path to the last little bit of image accuracy. We can’t take you through the advanced settings of every of TV, but we can tell you about the most common settings and what they do. Note that you may see some of the same adjustments in the advanced settings as you do in the basic settings. These generally serve as a baseline for the common controls.
 Vizio
Vizio
A section under Advanced settings such as this one from an uber-bright Vizio P-Series TV is what you’re looking for when it comes to tweaking the finer points of your image.
Temperature: Color temperature settings affect the intensity of color across the spectrum in what’s basically a curve. They generally offer only a few choices that conform to industry standards. In effect, these run from cool (accentuating the blue end of the spectrum) to warm (the red end). Try the various temperatures before you mess around with the fine settings described below. We recommend you stick with the default unless you’re trying to match the output of another device or medium. About 5800K closely mimics sunlight.
Many TVs offer modes, such as sports, computer, gaming, movie, and so on that involve color temperature changes. These might be a better option if you like keeping things simple.
White balance: This goes hand in hand with the RGB settings below, because it is the amount of red, green, and blue used to create pure white. With technology capable of producing pure red, green, and blue this would be easy. Quantum dots and OLEDs come close, but no other technology really does, so this will generally be an approximation, and you’ll need to decide if you want a warm or a cool white.
RGB gain and offset: If your colors are skewed towards red, green, or blue, you can reduce or increase their level using these controls. Generally, you’ll use a white image and adjust the component colors so the image is actually white, or as close to it as the TV will render it. Again, you’re at the mercy of the technology. Many cheaper TVs simply can’t produce an accurate green or red due to the blue skew of the white LED lighting they employ. Also see White Balance.
Gamma: In several paragraphs, we could tell you what gamma is exactly (it has to do with interpreting a color space in terms of luminance). Instead, think of it as the equivalent of an audio mid-range control for your image. Gamma doesn’t affect white or black, but the luminance of colors in between. Too high a setting and they’re too dark; too low and they’re too light. The goal, unless you’re trying to match the output of another type of device, is to retain detail in dark areas, while not blowing it away in lighter areas.
Adjustment by phone
No, we’re not talking about calling tech support. This is about using THX’s Tune-Up app, which is available for both Android and iOS devices, and others. Install it on your smartphone, connect the phone to your TV via HDMI, and the app will display calibration images (we used some of the older ones above), walk you through adjustments, and measure levels using the phone’s camera.
It’s free, aside from the video adapter you’ll need to display its images on your TV. You could use Chromecast, but compression might prevent you from getting accurate colors and this functionality is broken according to the latest reviews. The app has not been updated in a while, so you’re on your own for that.
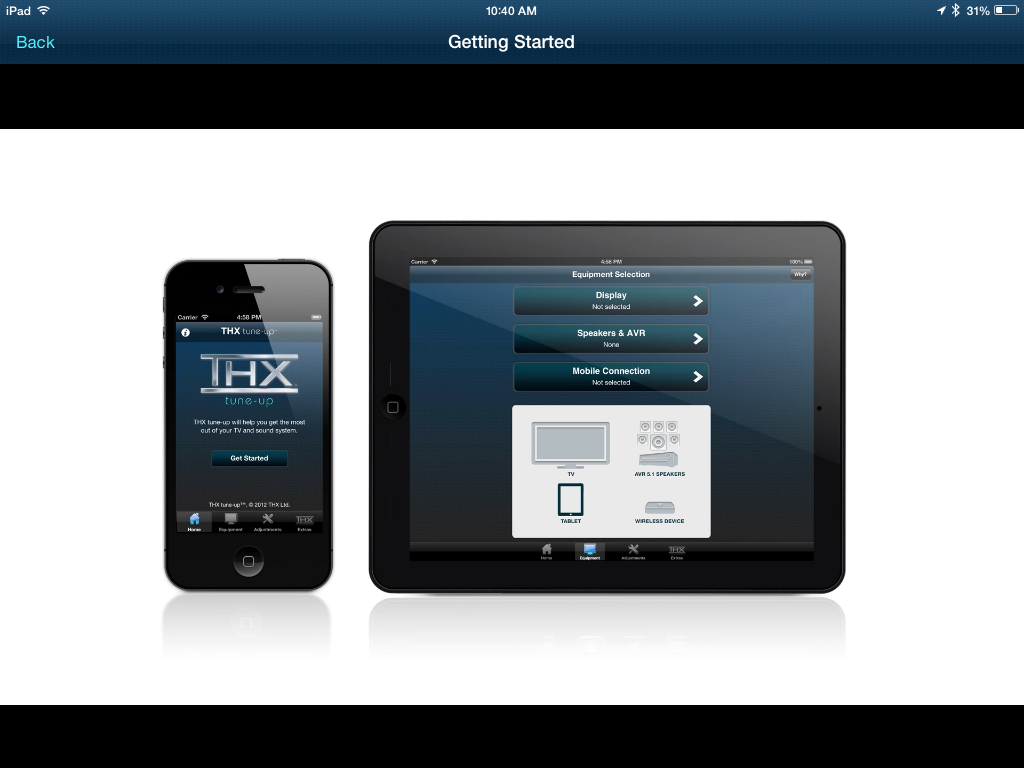 THX
THX
Run this free THX calibration app on your tablet or smartphone (Android and iOS versions are available) and you’ll have your TV image in tip-top shape in no time. You’ll need a hardware connection to the TV (HDMI) for best results.
Spears & Munsil test disc
We’ve recently taken to using this $40 calibration disc as part of our own test suite, as it features a veritable host of tests for motion, brightness, line and pattern rendering, etc. It’s as comprehensive as they come, but some of the actual calibration tests require that you have a light/color meter of at least passable accuracy.
This could again be your phone, or you could grab something like the portable UPRTek MK350N spectrometer than we now use—but that’ll cost you a cool $1,700. There are a lot of options in between, but your phone is likely to be as accurate as your perception and you can always upgrade if needs be.
We also recommend the test disc for those still shopping. If you ask nicely, maybe your salesperson will let you play the disc on the TV. This of course assumes the store actually sells the increasingly rare Blu-ray disc player.
The high-priced spread
Now if you’d like really like everything as close to perfect as possible, but you don’t want to spend a lot of hours being certified or learning about calibration, there is an alternative that’s widely supported: Portrait Displays’ $145 CalMan Home comes in versions for Samsung, Sony, LG, and Panasonic TVs. Each is brand specific in terms of its AutoCal function, though you can use them manually with any TV. You will need a supported meter.
 SpectraCal
SpectrCal’s CalMAN calibration software interface. If you really want to get down to the nitty-gritty, this is the level of complexity you’re going to deal with.
If you want the ability to cross brands, there are professional versions of CalMan starting at around $2,000, but again, the meter is sold separately. Note that the original developer SpectraCal was acquired by Portrait Displays and the formerly mentioned Enthusiast bundle is no longer available.
With any TV or projector that supports CalMan, which also includes models from JVC and Sharp, you can use the AutoCal function to automatically adjust the settings in a few minutes. Depending on the TV, generally all that’s required is pushing a button or two and running the meter over the display surface. Sweet. If you have the right TV and—a meter.
Final Advice
Far be it for us to tell you what you want to do with your TV, but calibration can be a very interesting and educational experience if you have the tweaking gene (or compulsion). Our own vintage SpectraCal setup is a hoot to use, albeit in a much geekier, number-heavy fashion. That said, there’s a reason we bought the MK350N, which spits out nice neat images without the need for data interpretation.
We were pleased results with the THX app, as well as our pay methodologies, satisfied with what we came up with using the standard adjustments by eye, and to be honest, generally satisfied with the picture of most TVs without any tweaking at all. But where’s the fun in that? Have a go with the tweaks, and remember—there’s a picture reset function. Mis-calibrating your TV won’t break anything. Enjoy!
Author: Jon L. Jacobi, Freelance contributor

Jon Jacobi is a musician, former x86/6800 programmer, and long-time computer enthusiast. He writes reviews on TVs, SSDs, dash cams, remote access software, Bluetooth speakers, and sundry other consumer-tech hardware and software.