If you know anything about NAS (Network Attached Storage), you know that it’s a great centralized backup receptacle for your PCs. If you didn’t know, we just told you. Actually, the name is bit of a giveaway: NAS is storage that you attach via ethernet or Wi-Fi and access across the network. What that doesn’t tell you is that most NAS boxes have the smarts of a PC, with a full-blown app environment that includes extensive backup abilities.
But there are two things that even NAS-aware users might not realize: First, many NAS boxes are perfectly capable of backing up data from PCs running any type of operating system (e.g., Windows, OS X, or Linux) from anywhere, using nothing more than their integrated utilities. All you need to do is configure the PC to give up its data, and then use the NAS box to grab it.
Second, most NAS boxes can also sync with OneDrive, Google Drive, DropBox and other cloud services to keep your mobile data backed up, too. Sadly, Apple’s iCloud is one of the few services that is not widely supported. But there are ways, and I’ll cover NAS/online syncing at the end for this article.
There are of course any number of ways to back up to a NAS box that can be invoked locally; i.e., from the PC or device you want to back up. But nearly all involve installing software or client apps or using native backup solutions. Some NAS vendors even provide their own proprietary client/server solutions. Indeed, if you want to back up whole partitions or drives to images, you can only do it from your PC.
But if you’re like me, the last thing you want is yet another program bugging you with reminders, warnings, and other messages, not to mention chewing up CPU cycles that you might want for more useful purposes. Why not just use the integrated file-sharing capabilities of computers and leverage the software on the NAS box, instead?
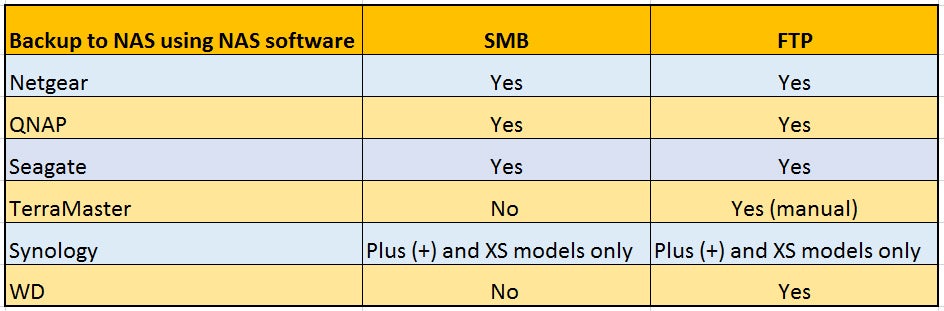
I’ll show you how to use the backup and sync apps on a NAS box in a bit, but first you need to select a sharing/transfer protocol and configure your computers.You have two choices: SMB (Server Message Block), which is simple to set up on PCs, or FTP (File Transfer Protocol), which can work both locally and remotely. FTP is almost universally supported by NAS boxes for remote-to-local backup, while for some reason, SMB isn’t always.
Your NAS box might choose the protocol for you. WD, for instance, only supports FTP for backing up to the box, Seagate supports SMB and FTP, while Synology doesn’t support either on many of its less-expensive boxes.
The chart below lists some of the more popular NAS box vendors and which protocols they support for remote to local backup.
 Jon L. Jacobi
Not every NAS box manufacturer supports backing up from a remote site using the SMB and FTP protocols and the on-board apps. Synology supports both, but only on its more expensive models.
File sharing/SMB
The simplest way to back up computers on a local network is via SMB. It’s the standard network protocol for Windows PCs, and is what is used by Windows simply as file sharing. But it’s also supported by Macs and Linux PCs. In fact most NAS boxes run some form of Linux.
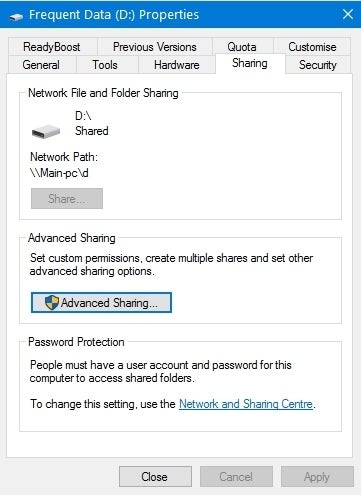
The basic concept here is to enable sharing for each folder on your PCs you want to back up, then simply point the NAS box to those shares and tell it to back them up. Personally, I share entire drives, then select the folders to back up using the app on the NAS box, but sharing only specific folders is fine as well. Make note of the IP address, user name and password for every PC you want to back up. Below is a step-by-step description of how to enable sharing a folder on Windows.
Setting up a Windows PC starts in the Sharing tab in the Properties dialog that pops up when you right-click on a drive or folder and select Properties from the context menu.
 PCWorld
Once the dialog above is open, click on Advanced Sharing. In the dialog, check Share this folder, then click on Permissions. Depending on the folder, you might see your user name, or Everyone in the list of users.
To limit permissions to a single user:
- Select Everyone, then click Remove.
- To add a user (required), click on Add, and in the next dialog, type in your user name or the name of the user you’ll be logging on with from the NAS box. Click on the Check Name button make sure it’s a legitimate choice and you’ve spelled it correctly. If you have, Windows will underline it, and put the name of your PC or domain in front of it. Click Okay, and you’ll return to the previous dialog.
- If all you want is to back up the drive or folder, de-select Full Control and Write, leaving Read checked.
That’s all there is to it for a Windows PC.
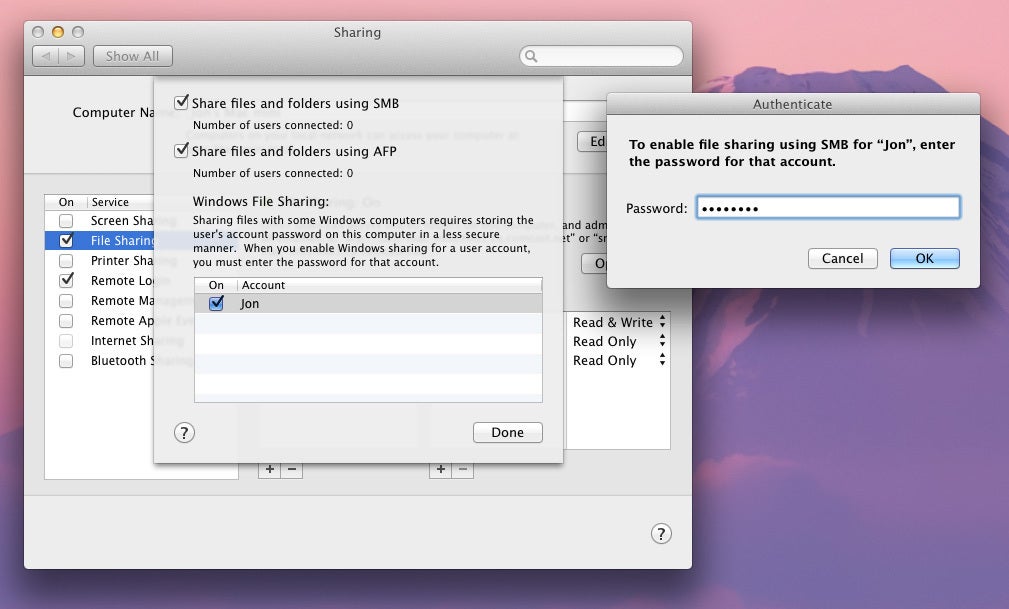
It’s even easier on a Mac as almost everything is already shared by default, but you need to turn on SMB sharing for the user you want to log on as before it will be accessible by the NAS box.
 Apple
Apple
Setting up SMB on the Mac is easier than Windows, and most folders are already shared.
FTP
SMB is the easiest for computers on your local network, but how about your mother’s PC across town? Or even your downtown office PC? FTP, one of the oldest file transfer technologies around, is just the ticket.
Setting up your PC as an FTP server takes a few steps, but is not at all difficult. This example is based on Windows 10, but the process will be similar with other versions.
- Open the Control Panel and go to Programs > Turn Windows features on and off.
- Scroll down to Internet Information Services, expand it, and check the FTP box.
- Make sure FTP Extensibility and FTP service are both checked. Also make sure the Web Management Tools are installed.
- Hit okay and the FTP server will be installed.
 Microsoft
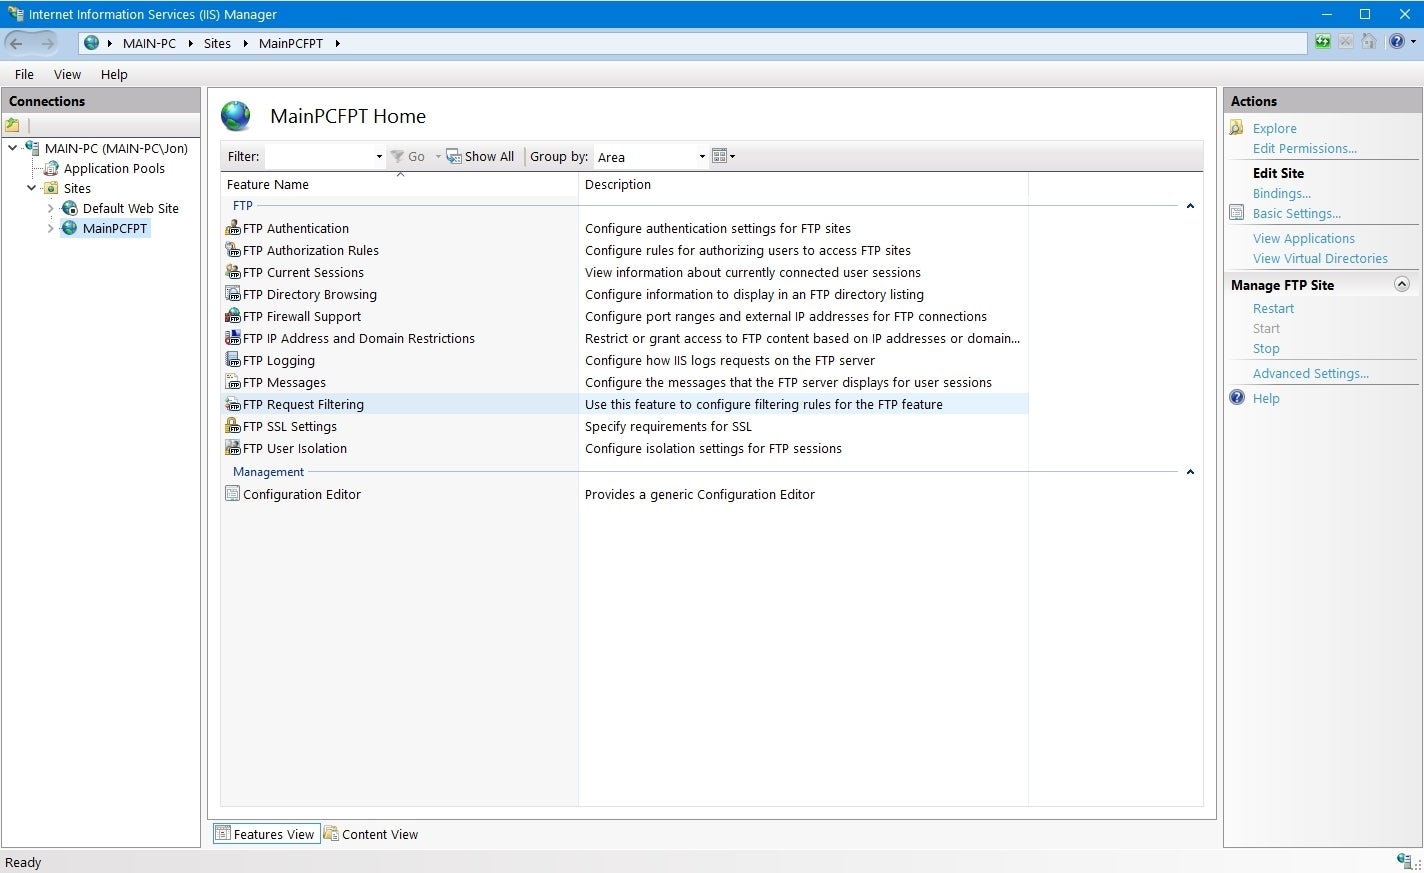
You can create FTP sites using the Windows Internet Information Services console, after you’ve enabled it under Control Panel > Programs > Add or remote programs > Turn Windows features on and off.
Close the control panel, type IIS into the search field on the task bar, and select the Internet Information Services app that will appear above.
- Look in the far left column for a folder called Sites. Right-click on Sites and select Add FTP site….
- In the dialog that pops up, give the site a name, such as “MomsFTP,” and browse to the directory that you want as the main source for the site. This will be the directory or folder you want to back up, although if you prefer, you could back up files from other locations to that folder as well. You can add other folders to the site later.
- Hit next and from the drop-down IP menu select the IP address of the PC you’re on. If you don’t know this, look under Control Panel > Network and internet > Network and sharing center > Active Network > Connection > Details > IPV4. This assumes you’re using a normal home router and haven’t switched to IPV6.
- Make sure Start FTP site automatically is selected, then select No SSL (assuming only local access from your home network), or leave it unselected if you’ll be backing up from a remote location, and again click Next.
- On the next page, leave Basic security checked. Only check Anonymous access if you want everyone to be able to see the site without entering a username and password. This is probably a bad idea for most of us. The username and password will be the Windows username and password for the PC you’re setting up.
- Click Finish.
- Go to Control Panel > System and Security > Windows Defender Firewall > Allowed apps and make sure that FTP Server is allowed.
To add additional folders to the site, right-click on the name of the FTP site in the column to the left (once it’s up and running), and select Add Virtual Directory. Then simply browse to the folder (or drive) you want and add it. In the Features pane, select FTP Directory Browsing and make sure that Virtual directories is selected. Easy Peasy.
Note: Depending on your NAS box, you might need to switch between MS-DOS and UNIX browsing under IIS > FTP site > Directory browsing. Otherwise, folder names may not appear.
Set up your Mac as an FTP site
To enable the FTP server on MacOS, open a Terminal, paste the following at the command prompt, and hit enter:
sudo -s launchctl load -w /System/Library/LaunchDaemons/ftp.plist
To disable the FTP server, paste this and hit enter.
sudo -s launchctl unload -w /System/Library/LaunchDaemons/ftp.plist
Unlike with Windows, all folders will be available by default. Yes, it’s easier than Windows once you get past using the Terminal. Note that drives and their contents are found under the Volumes folder.
Note: As of late, Apple has thoughtfully omitted the FTP server files. You’ll need to install them yourself. OSX Daily has a how-to on the subject. SFTP (Secure FTP) is still included so if your NAS box supports that, you’re still set and SFTP is safer if you’re exposing your transfers to the world.
Set up your NAS box to back up
Now for the fun part: Setting up the backup job on your NAS box. I don’t have the room to lay out specific instructions for every NAS box, but it basically goes like this: Open the backup program, select the local directory to receive the backup, choose the SMB or FTP protocol, browse to the IP address of the source and select the folder you want to back up to the box, and then adjust the schedule to taste.
As mentioned previously, you’ll need three pieces of information to do this: the IP address of the remote PC to be backed up (local and/or public if it’s remote), the user name for the computer, and the password for that user. The NAS box needs this information to find your PC and log on. You might also need the paths of the drives or folders you’ll want to back up, depending on whether your NAS box lets you browse the destination. Most will, with the notable exception of Netgear when using FTP.
As I mainly use a QNAP HS-251, here are the specific instructions for that box. Others will be similar.
 QNAP
QNAP
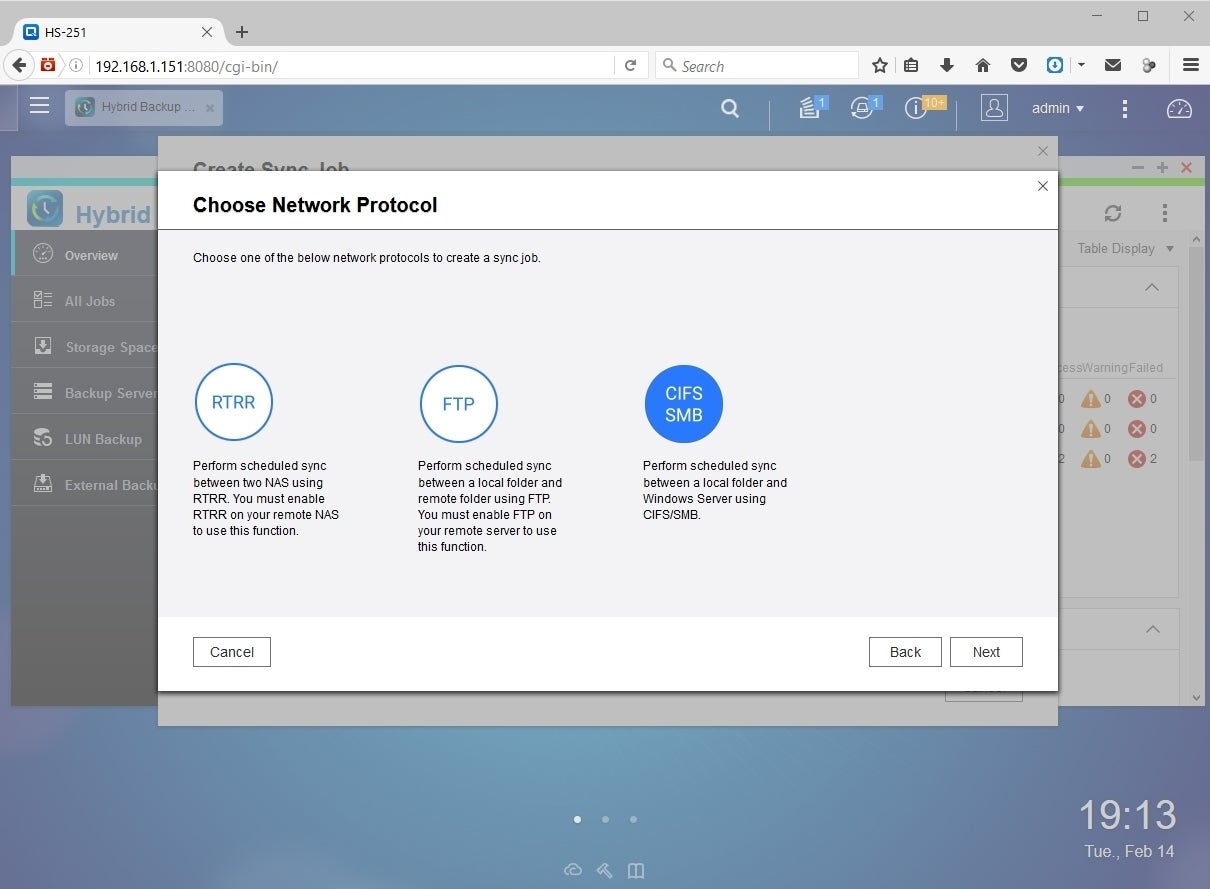
Once you’ve opened Hybrid Backup Sync, you’ll want to go to FTP or CIFS/SMB under the remote to local sync menu.
If you haven’t installed Hybrid Backup Sync, go the the Apps section and install it. Many other NAS boxes—such as WD’s and Seagate’s—will already have any backup features pre-installed. From the Overview page, select Sync. Yes, we’re going to do a one-way sync, which is like a mirror of your source. If you want a true backup, i.e. a point-in-time saved image, you’ll need to use other means.
- Check One-way Sync and then select Sync with remote server.
- Select Remote to local sync.
- If you’re going to use normal file sharing, select CIFS/SMB, if you’re going to use FTP, select that.
- In the Create Sync Job dialog that pops up, give the job a meaningful name such as “Office PC to NAS” and then click on the Settings button below that.
- In the Add Remote Connection dialog that pops up, give the remote PC a meaningful name such as “Office-PC”, type in its IP address, the user name you want to log on as, and that user’s password. In the folder, type in the share name.
- Click Test. If you entered everything correctly, and the remote PC is online, you will see Succeed. Click okay and exit.
Now it’s just a matter of selecting the Local destination folders and Remote source folders from the NAS box and the remote PC. Click Add for each pairing and then save the job.
Scheduling
If there’s anything at all tricky about using your NAS box and SMB/FTP to back up your stuff, it’s making sure that everything is on when the backup is scheduled to run. In my experience, the backup process requires so little effort on the part of the PC being backed up that it’s unnoticeable, so I set the backup for times I know I’ll most likely be using the PC.
There’s a backup running as I write and there is absolutely nothing to indicate that the operation is taking place. No slowdowns, no dialogs, no nothing. The only reason I know it’s in progress is checking with the NAS box via its web browser interface. I truly love it.
Cloud sync
All NAS boxes feature apps that will sync with online services. Which services and how many of them varies, but the most important are those used for backup by phones: Google Drive and OneDrive. Alas, Apple doesn’t allow access to iCloud from anything other than its own apps. If you’re an iPhone user, I recommend using DropBox.
QNAP is definitely the heavyweight in terms of the number of other services it supports: Google Drive, Dropbox, Amazon S3, Microsoft Azure, and OneDrive to mention just a few, so this is another item to check when you’re shopping. I’m not going into setting up your phone to back up to the cloud. They all do, so read the instructions.
Setting up these apps is almost exactly the same as it is from other devices. Generally, the setup will take you quickly to the site of the service where you can okay access by the NAS box and you’re all done. You might have to define a folder to store the synced data, but that’s about it.
Caveats
I haven’t talked about the security of these operations. They are generally safe, especially if you limit them to the local network, but they are probably not suitable for defense contractors. That’s putting in mildly. I have no problem using these methods, and I have for decades, but I recently did suffer a ransom-ware attach via WordPress. Due to that, I no longer expose any NAS box with important data on it directly to the Web and recommend that you use SFTP if you do.
Also what I’ve described is actually a one-way sync, rather than a true static, point-in-time backup. You can, however, define a job as one-time and then change the destination folders. I generally just let my jobs run regularly, then I also create an image backup once every few months. (Using Paragon Backup and Recovery or R-Drive Image.)
Note: It’s also a good idea to check once in a while to make sure everything is still running smoothly and that IP addresses haven’t changed, or the FTP services haven’t gone belly up. The latter happens occasionally in Windows.
Final words
Warnings aside, the absolute best thing about using a NAS box and this methodology is that once it’s set up, it’s completely transparent and requires zero intervention under normal circumstances. That’s very important as it’s become abundantly clear over my two decades of writing about backup that the hardest part is actually getting around to doing it.
Once you’ve set your NAS box up, you’ll probably forget it’s running. But if data disaster strikes, you’ll have a big ole’ grin on your face once you remember that you did this.
This article was edited on 2/16/2017 to note that IIS will not be available unless you install the Web Management Tools and check to make sure that the FTP server is among the Window Firewall’s allowed apps.
This article was edited 5/26/2017 to add information about FTP Directory browsing settings to the FTP discussion, as well as specifying that the chart describes the protocols for backing up to the box using only the box’s on-board apps.
This article was edited 12/11/2019 to add information on security issues and the use of SFTP.